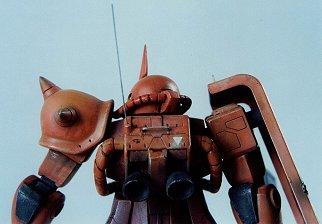
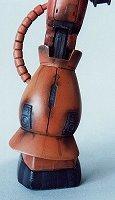
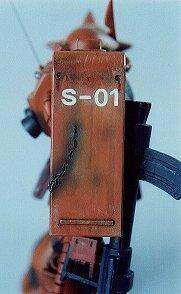
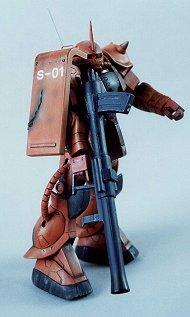
HEAD - The head is just huge! In every Zaku kit the head is ridiculously huge! And in every Zaku kit it must be drastically reduced, cutting plastic both in width and in height. First of all, I cut off about 2 mm of plastic in width from the two halves of the head. Then I cut the head above the visor and cut off about a mm of plastic, inclining this part slightly towards the front.

BODY - I didn't change much here. I modified all the skirts joints, using springs for their movement and added some details on the backpack.

ARMS - I added a handle on top of the right shoulder shield, done with copper wire. The gash on the shield was made with a hot needle.

LEGS - The legs joints to the lower part of the body are similar in concept to the B-joints, but they are so badly made here that they don't permit the freedom of movement that even a traditional joint should insure. In fact, the female part of the joint is too deeply inside the thigh and doesn't permit a correct lateral movement. I didn't use a B-joint but instead I cut out the female part of the joint and glued it down in a more external position inside the thigh. The male part was reduced accordingly. I also moved down the joints of the feet to the lower leg, in order to give the model a few more inches of height and a better mobility.

PAINT AND WEATHERING - I used a mix of painting techniques (airbrush, oil painting, dry-brushing, etc.) to achieve the results of realism that I wanted. I used mainly alcohol based Tamiya colours, heavily thinned to be used with

the airbrush or almost dry for the dry-brushing technique, but some effects were achieved with oil paint instead. The phases of painting were as follow:
1) I did a first layer of grey with the airbrush to have a uniform primer level.
2) I airbrushed layer after layer of very thinned paint, going from red to dark yellow.
3) Between one airbrushed layer and the other, in certain places of the model (joints, panels, verniers, nozzles etc.), I poured with a brush some very thinned dark brown oil paint, to simulate dirt, oil dripping, and joined parts. I repeated the points 1 and 2 until I thought to have reached a good result, both for the main colour and the dark weathering. The transparency of the layers of airbrushed paint upon the oil paint drippings gives the model the realism that I needed.
4) I added the other colours using mainly normal brushes.
5) To simulate worn out parts and the paint cracks I used the dry-brushing technique. Using a normal brush and almost dry paint, I stroke the parts of the model that needed the weathering. The colours

that I used are yellow ochre and different shades of grey.
6) To simulate the presence of slightly different panels on the lower part of the feet, I tried to use the airbrush with subsequent masks and the same paint, adding a variable amount of grey. This experiment was only partially successful, though.


Darth Model

BACK

HOME