eXperiments
1) How to install an NSBasic program using the eVb Tools Instal Wizard
2) How to use the HPCPro Mark Gamber's library on a PPC Arm powered
Two words to clarify.
There are several reasons that justify my eXperiments on the two above mentioned arguments. NSBasic is a very good development program, the only one that enable the user to write and test his code directly on the CE unit, it is a bit more quick than eVB Tools and offers some instruction not available in eVB. In addition (when it will be correctly fixed) the NSBasic Desk IDE will be the only available emulator of WinCE running under Win98. But ...... it is missing of an efficient install program to deliver user's code and the calling of API are not supported for ARM cpu (That appear to be designed to be the Killer Cpu on the market). eVB tools 3.0, on the contrary, has an excellent Desktop IDE (Microsoft docet). It has the native ability to declare calls to API and use a good install wizard that can create installation file quickly and with few instructions. On the contrary you have to try and debug your programs directly on your connected CE units. (Its emulator requires WinNT and anyway needs some fixes) All the above pushed me to do some experiments to discover new way to increase the NSBasic features. The target was to obtain the results without writing no line of code but using the common available programs. You may see here HOW. 1) eVB/NSBasic installation program. The first condition is that you must have, installed on your desktop computer the eVB tools 3.0 also installed. I think that it should not be a great problem because if you are interested in developing programs for WinCE/Pocket PC you should have that program available even if you prefer to use NSBasic.(anyway eVB tools is freeware from Microsoft). The second condition is to have a program developed using NSBasic CE that works as a standalone application (I.E. without using additional dll that are not the one usually used by both NSBasic and eVB). Please consider now the following: Try to modify the Microsoft code is impossible but the Wizard offer the possibility to add to the installed eVB program some user's files so... the problem is solved. We have only to develop in eVB a program that will operate as a shuttle to install our NSBasic program. You find herewith the relative code and the instructions to operate. If your final program's file is locate on your CE unit, copy it on your desktop using Active Sync. No matter in wich folder you copy it, you only have it on the same computer where eVB tools is loaded. Start eVB IDE and create a new project. Once more no matter about the project name. I usually use something like SetUpProj. On the eVB draw window you will see an empty form, while in the coding window you will get few lines like the following:Select now the Form window and drag a Command Button in the middle of the default form, thence click on the 'Project' menu, select 'Components....' and using the opened window check the 'FileSystem' component confirming by 'Apply' button and OK. From the side Tools Bar drag the File object into your Form. You will get something like this
Change the Button Caption in ''Adjust Link'' You have now to add some code to your form. If you do not want to write it directly you can copy and paste the following: Option Explicit Dim sOut as String Dim Part1 as String Dim Final1 as String Private Sub Command1_Click() On error resume next File1.Open "\Windows\Start Menu\*Programs\**name of your Prog.lnk", fsModeInput If Err <> 0 Then
MsgBox "Error! Check Link file"
Err.Clear ' NOW
Exit Sub ' THE
End If 'CODE
Do Until File1.EOF = True 'RUNS
sOut = File1.LineInputString()
If Len(sOut) <> 0 Then
Part1 = Mid(sOut, 1, InStr(sOut, Chr(46)))
Final1 = Part1 & "nsb" & chr(34)
End If
Loop
File1.Close File1.Open "\Windows\Start Menu\*Programs\**name of your Prog.lnk", fsModeOutput File1.LinePrint Final1 File1.Close App.end
End Sub
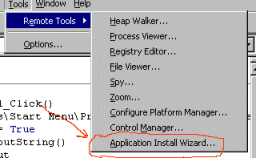
Private Sub Form_OKClick() App.End End Sub *. This folder name may change in the nationalized Versions (Sample: Progammi in Italian units) ** Remember that this name must match with your NSBasic's program name and also with the .VB file that will be created before using the Wizard. You are now ready to start. Select the Make ..... .VB file option as you can see below.I repeat it is important that your .VB files have the same name of your NSbasic program, so in the shown input window you must type, as name of your .VB file, the same name of your NSbasic program (that is also the same that you have to type into the above code). Create your file that will be located usually in the Evb folder. Go now to launch the Application Install Wizard that you find as below
Now you are ready to start the creation of the installation files.
The program allows you to create authomatically a set of files (Setup/Cab File and Inf file) that need to istall a program. We may continue. The program will show you some windows asking for 1) the path of your ebf file 2) the path of the relative .VB program (created by you as above) 3) the folder where to create your installation files. You will see now the following four windows in sequence: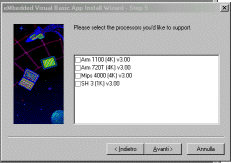
image 1 image 2
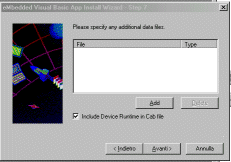
image 3 image 4 In the first window (image 1) you have to select the CPU for which you want create the install program. The second window allows you to add the additional library that your nsb program use (that are fortunately the same of eVB). We shall return to discuss this point later to optimize the procedure. The image 3 is the most important window. This input windows allows the user to add other files to the eVB program. This is where you have to add the full path to your NSBASIC program. Do not forget to uncheck the box to add eVB runtime files.They should be unuseful to our purposes. Take also note that the program ask you to define the added files System's file or not. The first will be loaded into \Windows folder the others in the same dir of the eVB support file. The last windows (image 4) request to insert the information to install your file. In the first field insert the installation path on your CE unit. In the second field the application name that must be the same of your program, thence a little description (that will be shown in application manager window and your or your company name. The next page that you will see will allow you to create the set of files clicking the relative button and you will get into the previously selected folder some dirs. The one named CD1 will be shown about like the following:
These are the file you need to install your NSB program. It is true that the Wizard program is available in eVB to install the eVB programs but ...... this is exactly what we do even if at the end a NSBasic program will be installed. The above set of files does its job and load, if you click on Setup the eVB support files along with your NSbasic .nsb file in your machine and install authomatically also a link in your programs list. Open the Programs list and you will find the link's icon. The original link points to the eVB support program instead of to the .nsb program, that is the one we want launch, and its icon show the eVB image instead of NSB icon. Well, as said, the above code has been written to bypass this problem so tap on the link and thence tap on the Command Button that you put in the middle of the form.. The eVB program will be closed and the second time taping on the link he will see your NSBasic program to start. On my unit the icon also has been authomatically changed. . Now you can (for the moment) deliver to your client 2 files only. The first is the NSRuntime installation file (ppc version for Pocket PC) that you find on NSB site or in your NSBasic CD. The second is the set of file created by this process. Instruct your customers to install the Runtime before, thence to run Setup and follow the above mentioned steps.
2) unknown .dll to be used to call API with ARM PPC. The tool in question is one of the best tool that i know to use with the NSBasic CE that allow the user to call API under WinCE. The author agreeded to release it freeware, without requesting any royalties also for commercial use. On delivery time the only unit powered by an ARM Cpu was the HP820, an HPC, and therefore into the MGCEWin32 package Mark Gamber (The Author) put only an HPC version of his .dll for the ARM. After reading that the old programs for HP820 worked well on the new HP720 PC2000 version i thought that it might be possible to use that dll with the PPC palm size also.(iPaq unit particularly). The target was tha same. To obtain the result performing common action and without modify the orginal code. To Justify this experiment please note that NSB staff was unable to contact the author to obtain an official upgrade so i tried to bypass the problem as you can read here. To verify that the hpc Arm version contained into MGCEWin32.exe istallation program run also fine on an Arm ppc unit you must start the usual installation with a click on the file. This will extract all the cab files contained therein in a subfolder of the Active Sync folder. In this folder will be loaded all Cab files for all the supported Cpu. If you launch the program without any CE unit connected you get the following prompt.anyway the the CAB File you need has been extracted into the folder C:\Programmi\Microsoft ActiveSync\ MGCEWin32HPCPRO_ARM. Use Winzip (for example) and estract all the files contained into the above mentioned cab.
One file only contains the .dll file you need but this one and the others (that are only text instructions files) still have the original Cab internal name. Extract them to a temp folder you like a start to rename them as planned by the Author i.e as follows: Mgcewi~1.001 Rename MGCEWin321.Txt ( 16K ) Mgcewi~2.002 Rename MGCEWin322.Txt ( 13K ) APIEvent.003 Rename APIEvent.Txt ( 375 byte ) 0APIMisc.004 Rename APIMisc.Txt ( 3K ) Apista~1.005 Rename APIStatus.Txt ( 3K ) APIShell.006 Rename APIShell.Txt ( 945 byte ) Registry.007 Rename Registry.Txt ( 2 K ) 000Timer.008 Rename Timer.Txt ( 607 byte ) 000Tray.009 Rename Tray.Txt ( 919 byte ) 0RASTest.010 Rename Ras.Txt ( 3 K ) 00smimg1.011 Rename smimg1.bmp ( 246 byte ) optional icon for link 00smimg2.012 Rename smimg2.bmp ( 246 byte ) optional icon for linkl Mgcewi~1.013 Rename MGCEWin32.dll ( 132 K ) Path \Windows Connect your CE ARM Unit (iPaq for example). You will get an error when Install Manager will try to load the files extraxted by you previously. Ignore it, Abort installation and manually copy the renamed files in its own directories. The last step that to execute is to register the .dll Class. You may do this also manually or install and use a program that could register the .dll for you. At this point the original aborted installation is completed. I omitted to use the link to the instructions because also with authomatic installaton i prefer to delete them and move the instructions files on the storage card to save space. You have now installed on your ARM PPC unit the original .dll developed by Mark Gamber that work (did you have any doubt ?) with ARM palm PPC also. MARK i have been glad to do this experiment but if you can update your program it will be better. DISCLAIMER
Even if no change are performed on the original code i am not fully sure that the use of the .dll so obtained fully comply with the author licence rules. So i will not use even if in freeware use the library until i will get a legal opinion about the matter. In this connection whoever will use the library will do this at his own risk without any responsability of mine for whatever reason.