The program herein is a Beta version and
its instructions and code are subject to change.
 Take note that you use them at your own risk .
The Trademarks NSBasic CE and eVB tools 3.0 pertain to the respective owners
The program herein is a Beta version and its instructions and code are subject to change. Take note that you use them at your own risk . The Trademarks NSBasic CE and eVB tools 3.0 pertain to the respective owners
How to install an NSBasic program using the eVb Tools Install Wizard
Two words to start.
There are two languages that allow the programmers to develop applications under WinCE and/or PPC. NSBasic and the Microsoft eVB Tools 3.0 (Freeware from Microsoft). NSBasic uses its own runtime, offers some useful instructions not available in eVB, seems to be a bit more quick, allows to write programs directly on the CE unit and (as soon as the current bugs will be fixed) will be the first and only CE emulator running on a Win98 Desk computer. But .... it is missing of an easy way to create installation packages to deliver user's programs and it does not support the API calls.(without additiona Dll) On the contrary eVB is an excellent Desk IDE, has its desk emulator (but you need to use Win NT), a good Install Wizard and support natively the Api call. To add to NSBasic some of the missing features i started my experiments to let user available, in this case, an installer tool, and i found that i can do it using to solve this problem developed using eVB. I think that it should not be a great limitation because who is interested to develop programs for WinCE/Pocket PC should have that program available even if he prefers to use NSBasic.(anyway eVB tools is freeware from Microsoft). Yes, i started my research as a strange experiment but it became a real Installer Program developed using eVB 3.0 tools. If you like to use directly the eVB code template you can find it in the DOWNLOAD page (remember you must have eVB Tools 3.0) This does not means that you cannot see the code (remember that you have to customize it ) but that you can now open it directly into the eVB IDE instead of to copy or write the code. The relative instructions to use it are the following: Use the eVB installer program for NSBasic. In the eVB program installed on your desktop computer and using the relative PPC SDK, open the downloaded program that you must before copy into the folder you wish. Copy also your NSB program on a folder's desk using Active Sync if you developed it on your CE device using NSBasic. The above are the basic action to do starting to create an installation set of files. In the eVB Form window of the IDE you will see a form like the one shon below.If you are following my experiment from the beginning you will find the form changed. First about 2/3 of the form are now occupied by a multiline Text Box where yo can write your Disclaimer / Licence agreement. The Button Caption is not only ''Adjust Link'' as before because the Button now is used to Adjust the link but also to register proprietary .dll if necessary. Go now to the Code window of the eVB program and you will see the code of my program. Search first the following line of code Testo = "................................................" Here you have to write your Informations/Licence rules/Disclaimer text . Delete my own disclaimer text string and write what you want as free string but remember that there is no much space in text box. Thence search the following lines File1.Open "\Windows\Start Menu\*Programs\**name of your Prog.lnk", fsModeInput
and File1.Open "\Windows\Start Menu\*Programs\**name of your Prog.lnk", fsModeOutput and in both the lines insert in the place marked by * and ** the path and the name of your NSB program.About the path you can rally change it only to the word used to identify that folder in your nationalized system (i.e for example 'Programs' or 'Programmi' etc.) while the name should be exactly the name of your .nsb program. Going down search a line like this one RetVal = CeCreateProcess("regsvrce.exe", "\Windows\<moduleName>.dll",_ 0, 0, 0, 0, 0, 0, 0, 0) If your .nsb program is a standalone program (i.e does not use proprietary Dll or only the MSCEfile dll ) you can put on top of line a REM to prevent the use of this instruction otherwise substitute the <module name> words with your Dll's name. If your program uses more than 1 additional Dll, copy and paste this instruction the times you need and write therein the names of your libraries. You are now ready to start. Select the Make ..... .VB file option as you can see below.Remember it is important that also your .VB files have the same name of your NSbasic program, so in the shown input window you must type, as name of your .VB file, the same name of your NSbasic program (that is also the same that you have to type into the above code). Create your file (i usually load it into the Evb folder) but you may choise. Go now to launch the Application Install Wizard that you find as below
When the window open you are ready to create the installation package.
The program allows you to create authomatically a set of files (Setup/Cab File and Inf file)
that need to istall a program.

We may continue. The program will show you some windows asking for
1) the path of your ebf file
2) the path of the relative .VB program (created by you as above)
3) the folder where to create your installation files.
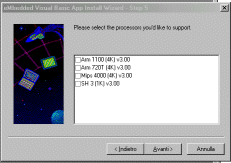
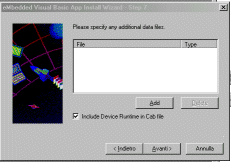
You will see now the following four windows in sequence:


        image 1                             image 2


        image 3                             image 4

In the first window (image 1) you have to select the CPU for which you want create the install
program. The second window allows you to add the additional library that your nsb program
use (that are fortunately the same of eVB).
We shall return to discuss this point later to optimize the procedure.

The image 3 is the most important window. This input windows allows the user to add other
files to the eVB program.
This is where you have to add the full path to your NSBASIC program.
The Wizard will ask you now to define the added file(s) as System's file or not.
The .nsb program must be stated as normal (reply NO) and will be loaded in its folder.
For the eventual added Dll reply YES and they will be loaded into the \Windows directory
where the regsvrce.exe program will search them to register.

You may uncheck the box to add eVB runtime files.They usually should be present on a PPC.
If you are not sure you can check it. The final installation file will be greater but anyway only
the necessary files will be loaded on the device. (The user must reply NO if promped to allow
the substitution of any file)

The last windows (image 4) request to insert the information to install your file. In the first field
insert the installation path on your CE unit. In the second field the application name that must
be the same of your program, thence a little description (that will be shown in application manager
window and your or your company name.

The next page that you will see will allow you to create the set of files clicking the relative button
and you will get into the previously selected folder some dirs. The one named CD1 will be shown
about like the following:


These are the file you need to install your NSB program.
So with eVB and its Wizard program we developed a program to istall NSBasic code.

The above set of files does its job and load, if you click on Setup the eVB support files
along with your NSbasic .nsb file in your machine and install authomatically also a link
in your programs list.
Open the Programs list and you will find the new eVB link's icon with your program's name.
The original link points to the eVB install program instead of to the .nsb program
but this is correct as we have to complete the installation.
So tap on the link (your licence/disclaimer will be shown) thence tap on the Command Button
at the bottom.
If you loaded additional Dlls also you will start to see the 'Success registration windows'
produced by regsvrce program (that user must manually close taping OK) thence the
eVB program will be closed and the second time taping on the link the user will
see your NSBasic program to start.  On my unit the icon also has been authomatically
changed.


Obviously the procedure allows also to use unistall routine on the CE Unit. I suggest you
anyway to install the program REGFIX (freeware) that will prevent you trouble due to a
Microsoft bug unitalling his programs.

AND THIS IS ALL, FOLKs
.
Now you can deliver to your client 2 files only.
The first is the NSRuntime installation file (ppc version for Pocket PC) that you find on NSB
site or in your NSBasic CD. The second is the set of file created by the Wizard eventually
stored into a self extracting compressed file.
Instruct your customers to install the Runtime before, thence to run Setup and follow the
above mentioned steps.

FURTHER UPGRADES PLANNED:
To hide the regsvrce window prompt (When i will be sure that all go fine)
The Installer Wizard page (VB5) to change the code easyly has been already
created and is available HERE

You may go to the download page to get the program PointCEppc for Arm to see how this
installer works. (the program's version needs an update but it is useful anyway)


DISCLAIMER
Anyone that will use these procedures, program or library will do this at  his own risk without
any responsability of mine for whatever reason or damage caused by the use of them.

Somebody may think that that the above represents a not correct use of the program (the Wizard)
that Microsoft delivered to be used with their language but i consider that:
INSTALL PROCEDURE: eVBtool has been used to produce a regular eVB program in accordance
to the free use for which Microsoft delivered his package.The created program configure itself as
an installer program so the NSB code added during the use of Install Wizard must be considered
as a file the the eVb program needs to be executed and this is the exact reason for which the
Wizard window allows to add external files to the Microsoft eVB program.


If you wish to see further workaround to increase the features of your NSBasic language
see here